Velox BuildPost Date: 2015-09-07 |
Post Reply 
|
| Author | |
Uglyyoda 
Newbie 

Joined: 05 Sep 2015 Online Status: Offline Posts: 12 |
 Quote Reply Quote Reply
 Topic: Velox Build Topic: Velox BuildPosted: 07 Sep 2015 at 9:35am |
|
Budget:
5k Expectations: Want a system I can continue to upgrade for 3 to 4 years that can keep up with gaming content. I am looking to get a second video card next year and install it with the liquid cooling system. One question I have is how easy is it to upgrade liquid cooling system. I have not fooled around with liquid cooling systems before. Can the card I chose also use the liquid cooling system. Usage: Gaming (Call of Duty, WoW, LoL, Starwars, EVE). Also used with home media system on 80 LCD screen. 27in Monitor with 144 refresh. Special Needs: Have lots of storage content. Movies, Video, Pictures. Went went a two drive system. I have an external backup. Saved Ticket #: 1277612 https://www.digitalstorm.com/configurator.asp?id=1277612 Specifications: 1. Chassis Model: Special Deal Hot Seller - Digital Storm Velox Exterior Finish: - Standard Factory Finish Trim Accents: - Standard Factory Finish 2. Processor: Intel Core i7 5820K 3.3GHz (Six-Core) (Unlocked CPU) 3. Motherboard: GIGABYTE GA-X99-UD4 (Intel X99 Chipset) System Memory: 16GB DDR4 2666MHz Corsair Vengeance LPX (High-Performance) 4. Power Supply: 1000W Corsair HX1000i (Digitally Controlled Power) 5. Optical Drive: DVD-R/RW/CD-R/RW (DVD Writer 24x / CD-Writer 48x) 6. Storage Set 1: 1x SSD mini-SAS (400GB Intel 750 Series) (2.5 inch - NVM Express) (Extreme Performance) <br><strong></strong> Storage Set 2: 1x SSD (1TB Samsung 850 EVO) <br><strong></strong> Storage 7. Internet Access: High Speed Network Port (Supports High-Speed Cable / DSL / Network Connections) 8. Graphics Card(s): 1x NVIDIA GeForce GTX 980 Ti 6GB (ASUS Strix Edition) <br><strong></strong> 8. Sound Card: Integrated Motherboard Audio HPC Processor: - No Thanks 9. Extreme Cooling: H20: HydroLux Level 2: Digital Storm Exotic Custom Cooling System (1x Video Card + CPU + Chipset) <br><strong></strong> 10. H20 Tube Color:Red Tubing (Requires Custom HydroLux Liquid Cooling System) <br><strong></strong> 11. Chassis Fans: Upgrade All Fans to Corsair Airflow Performance Edition (Up to 6 Fans) <br><strong></strong> 12. Internal Lighting: Digital Storm RGB LED Lighting System (Requires Thermal Management Control Board & Software) <br><strong></strong> 13. Airflow Control: Digital Storm Thermal Management Control Board & Software <br><strong></strong> 14. Chassis Mods: - No Thanks Noise Reduction: Any input is appreciated. Ugly |
|
 |
|
|
DS Veteran 
Joined: 28 Oct 2014 Online Status: Offline Posts: 1674 |
Quote Reply
Posted: 07 Sep 2015 at 12:04pm |
|
Looks really good to me!
|
|
|
|
|
bprat22
DS ELITE 
DigitalStorm East -- (Unofficially!)
Joined: 08 Jun 2011 Online Status: Offline Posts: 20391 |
Quote Reply
Posted: 07 Sep 2015 at 12:59pm |
|
Nice setup and, yes, there are water blocks available to put the card under water.
How easy it is to add another card in the loop depends how mechanical you are. I think its an easy to medium job, but thats me. Good luck. 
|
|
|
|
|
db188
DS Veteran
Joined: 29 Jul 2014 Online Status: Offline Posts: 2115 |
Quote Reply
Posted: 07 Sep 2015 at 1:50pm |
|
the easiest thing to do would be just to buy the card now and have it installed with the new loop by DS. however, if you have to wait and think you might want to expand on you custom loop later, it's simply a matter of draining/flushing (w/distilled water) your loop, acquiring the necessary parts (vid card water block, fittings, tubing, etc.) and following the directions to install them into your existing loop, then refill the loop and leak test, bleed the system of air bubbles and top it off with fluid. i'm not sure DS installs a drain port/tubing in their loops, but they make draining custom water loops less of a pain. you might want to clarify with them and have them add it in if they don't normally provide it. custom loops should be drained at least yearly, if not semi-annually.
things to consider: make sure you have enough pump and radiator to adequately cool your cpu, chipset, and all of the vid cards you plan on installing. this might require a separate loop for the vid cards, while keeping your cpu and chipset on the other. you always want as much rad as you can fit into your chassis. also, unless you're in love with a specific color of fluid, i'd stay away from dyed fluid. it will stain and gunk up your tubing, reservoir and water blocks over time. get colored tubing instead. Edited by db188 - 07 Sep 2015 at 2:02pm |
|
|
|
|
FrankW
DS Veteran
Joined: 22 Feb 2010 Online Status: Offline Posts: 2254 |
Quote Reply
Posted: 07 Sep 2015 at 2:12pm |
|
Hi Uglyyoda,
A really nice build. If you want to add a second Liquid Cooled GPU next year it can be fairly simple with planning. You can see one way to do it in the picture. Assume that the tubing on the top GPU is the in-flow and the connector on the bottom of the top GPU is the out-flow of that unit. Just follow the water through the second GPU and into the third GPU. The tubing on the bottom of the third GPU is the out-flow assuming the top cable is the in-flow. You can see that DS used quick disconnect connectors on the tubing. I suggest that you get the quick disconnect connectors so you can manipulate the tubing. With your single LC cooled GPU you would remove the cable from the bottom of the water jacket. Mount your second GPU and connect the top and bottom of the two GPUs with connectors like you see in the picture. Or you could use tubing but not as cleanly as you see in the picture. Then connect the out flow tubing to the bottom of the second GPU water jacket. Ask DS to make the bottom tubing on your one GPU long enough so you can add the second GPU. They may sell you the connectors already made up that connects the two GPU water blocks together. There may be a charge for DS to provide the quick disconnects or other connectors. This is a simple exclamation and you will have to deal with the liquid in the top GPU. The quick disconnects block the fluid when you unplug them so you will only have to worry about the fluid in the top GPU. So your first step would be to disconnect the input tubing so no additional fluid will drain into the top GPU. Study this picture and it should be clear what you have to do. Sorry, I couldn't find a picture with just two GPUs. I removed the picture of the Velox as it didn't apply to the subject. Frank 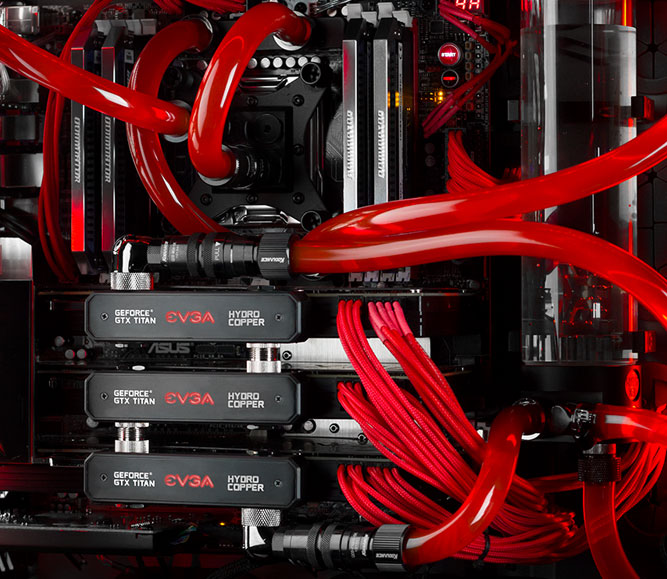
Edited by FrankW - 08 Sep 2015 at 9:18am |
|
|
|
|
db188
DS Veteran
Joined: 29 Jul 2014 Online Status: Offline Posts: 2115 |
Quote Reply
Posted: 07 Sep 2015 at 2:46pm |
|
just to expand on Frank's comments, here's a vid of a guy removing his mobo tray with Koolance quick disconnect fittings: https://www.youtube.com/watch?v=WuSZJGiopiU
obviously this wouldn't work with copper or acrylic based loops. as for 980ti Strix water blocks, EK (EK-FC980 GTX Ti Strix - Nickel) just came out with them, see here: http://configurator.ekwb.com/step1_complist#DB_inline?height=600&width=500&inline_id=vga_example_table Edited by db188 - 07 Sep 2015 at 2:56pm |
|
|
|
|
Post Reply
|
| Forum Jump | Forum Permissions You cannot post new topics in this forum You cannot reply to topics in this forum You cannot delete your posts in this forum You cannot edit your posts in this forum You cannot create polls in this forum You can vote in polls in this forum |
About Digital Storm
Contact Information
Facility Tour
Financing
Buy Now, Pay Later
Downloads
GSA Schedule
Terms & Conditions
Privacy Policy
Request Help
Call: 1-866-817-8676
(Hours 9AM-5PM PST)
![]()
![]()
![]()
![]()
![]()


 Topic Options